Microsoft Fabric And Terraform
Table of Contents
I haven’t written here for a while, and in that time I have been doing a lot of work on Microsoft Fabric, a SaaS Data Platform that uses the PowerBI ecosystem and components from Synapse.
It is still a rapidly developing tool, and recently a Terraform provider has been made available. As I love all things declarative (hence Nix and K8s), I wanted to dive in and explore how it could be used.
The specific use case I’ll be exploring will be for a business that has an existing wealth of data in a data store that has Shortcut support, and want to be able to provide an advanced analytics ecosystem and the data to an analytics team, without giving them the keys to the kingdom or dealing with large IaaS overheads to create an environment.
Shortcuts are a powerful virtualisation concept that allows users to act on the data in Fabric’s OneLake without moving or copying it from where it rests. Currently this is supported with:
- Dataverse
- OneLake
- Azure Data Lake Gen. 2
- Amazon S3 / S3 compatible storage
- Google Cloud Storage
- Azure DataBricks Unity Catalog
- And more.
All the code for this can be found on my Github. and links to documentation for the core services are:
- AzAPI Terraform
- Fabric Terraform
- Fabric REST API
Getting Started#
Packages / Dependencies#
If you have nix installed, I have provided a flake that will get the required applications to follow this guide.
Simply running nix develop should drop you in to a shell with terraform, az, and jq (for JSON manipulation).
If you aren’t using Nix, you will need to install Terraform, AZ CLI and jq
Authentication with Azure CLI#
Lucky for us Terraform and AZ CLI work well together with little work needed. Using the
az login
command we can sign in as an admin and use these login details with Terraform to create our Azure and Fabric resources.
This will be an interactive authentication flow, so be aware that changes to this will need to be made if you would like to run this unattended, i.e. on Azure Devops.
Deploy Environment#
Variables#
Once we have authenticated we can start to create our Terraform environment. A number of variables are defined in the variables.tf file and the following can be used as a starting point for your terraform.tfvars file.
The terraform.tfvars is Git ignored to stop you leaking IDs
workspace_display_name = "<Name of workspace to create, i.e. project name>"
capacity_name = "<Name of capacity to create>"
subscription_id = "<ID of Azure Subscription to create RG in>"
administrators = ["<Capacity Admin>"]
tenant_id = "<Entra Tenant ID>"
workspace_members = ["<User Principle Names of workspace members, i.e. analysts>"]
fabric_tier = "<Fabric Tier, i.e. F2>"
Adjustments#
The Terraform can be adjusted to use an existing Resource Group if you would like, by changing the code from
resource "azapi_resource" "resource_group" {
  type = "Microsoft.Resources/resourceGroups@2018-05-01"
  name = "fabricterraform-rg"
  location = var.location
  parent_id = data.azapi_resource_id.subscription.id
}
to
data "azapi_resource_id" "resourcegroup" {
  type        = "Microsoft.Resources/resourceGroups@2018-05-01"
  resource_id = "/subscriptions/${var.subscription_id}/resourceGroups/<rg_name>"
}
Be sure to look at the workspace.tf and make changes to be more inline with what you want.
In the example I have written, it is a generic ‘Bronze Silver Gold’ Medallion set up with a Lakehouse Raw and Enriched, and a Warehouse Curated for the layers respectively. You may find you only want two Lakehouses, a Source (with shortcut) and a Target for where you will save your findings. You may want to have a generic Notebook that contains boilerplate for ML, and an Environment with Libraries.
Play around and use the Terraform documentation linked above to build your scaffold.
Running#
We can then run the following
terraform apply
It will plan and show what it will create or change, then provide the option to accept the changes or back out. If you were using this in an unattended flow, be sure to add the flag -auto-approve.
Notice how it will provide an output in the terminal for the
- Warehouse connection string, useful for connecting with clients such as dbt or Azure Data Studio
- Raw Lakehouse ID, useful for onward scripting
- Workspace ID, allowing us to target our new workspace items
Note: The terraform state seems to get mixed up with lakehouses when the capacity is paused. Be sure to resume the capacity before checking, or it will assume the lakehouses don’t exist and try to recreate them.
Create Shortcut#
Authentication and Variables#
Now that we have created our environment we can create a shortcut to our existing data platform in the Lakehouse. In the example below I will be using Azure Data Lake Gen 2.
This API is not able to use a Service Principle or Managed Identity.
We will need to know the ItemID of the Lakehouse, and the workspace ID. These can be retrieved from Terraform and set as environment variables as we have specified an outputs for the Lakehouse ID, Warehouse ID and Workspace ID.
LAKEHOUSE_ID=$(terraform output -raw RawLakehouseID)
WORKSPACE_ID=$(terraform output -raw WorkspaceID)
We can create a token for our REST call using the AZ CLI with:
az account get-access-token --scope "https://analysis.windows.net/powerbi/api/.default"
Request#
The request will be an HTTP POST call with the body being JSON that contains the configuration of our shortcut.
We will need to have it already set up as a valid connection in the Fabric platform. This can be done by going to Settings > Manage Connections and Gateways > New Connection.
The JSON body can be crafted based on the following:
{
  "path": "<Files | Tables>",
  "name": "<Name of shortcut>",
  "target": {
    "type": "AdlsGen2",
    "adlsGen2": {
      "location": "https://<Storage Account Name>.dfs.core.windows.net",
      "subpath": "/<container>/path/to/dir",
      "connectionId": "<Connection ID set up in Fabric>"
    }
  }
}
In this project, I store it as a Git ignored req.json so that I can easily manage the cURL request.
Finally our request can be made with the following cURL command:
curl -i -X POST "https://api.fabric.microsoft.com/v1/workspaces/${WORKSPACE_ID}/items/${LAKEHOUSE_ID}/shortcuts" \
  -H "Content-Type: application/json" \
  -H "Authorization: Bearer ${TOKEN}" \
  --data-binary "@req.json"
Done#
At this point you should have a new resource group, Fabric Capacity, Fabric Workspace, and Fabric Lakehouses/Warehouses. The workspace will have users added as members based on your variables, and the Lakehouse will have a shortcut to your data platform. All you need to do is message the analysts and let them get to work at app.fabric.microsoft.com.
Notes on Authentication and Ownership#
Service Principles#
For the above example haven’t covered in depth the authentication for each piece. Though Service Principles can be used (PowerShell example below), many of the APIs, including the creation of shortcuts don’t support Service Principles or Managed Identities.
This has some interesting side effects, namely that ownership of many Fabric items cannot be changed once they are created. As such, if you run this and create some Lakehouses, and Shortcuts, and your account is deactivated they will stop functioning as expected.
The Workaround would be to split this up in to creation of Lakehouses with Service Principles, and then create your shortcuts as a pseudo admin user with delegated permissions. See Identity Support for more details.
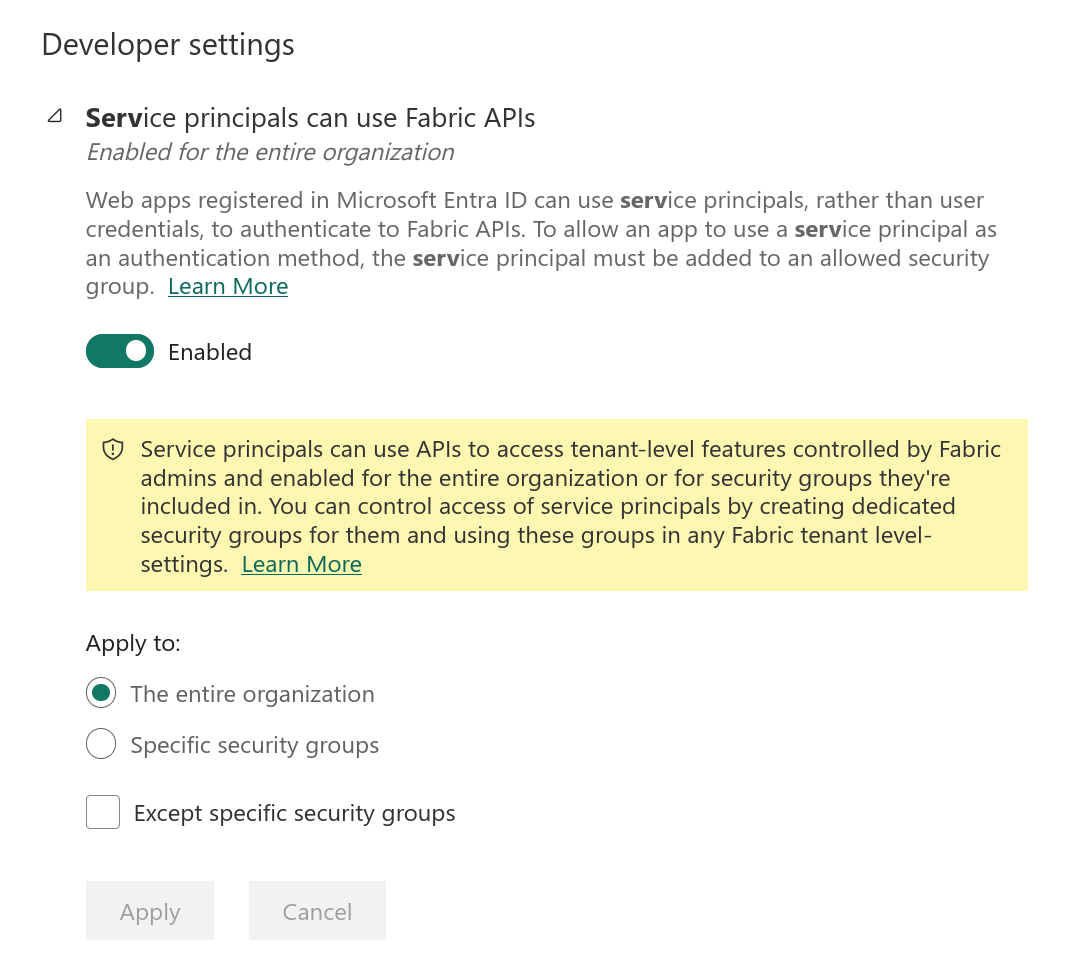
Don’t forget to enable Service Principles in the Fabric Settings!
Scopes#
When generating tokens, there are a few Scope values that will be useful to know, and so I have collected them here for reference. The main scope for PowerBI and as extension Fabric is https://analysis.windows.net/powerbi/api/.default.
When creating a token for use with a service principle, or in the AZ CLI as below, we will use this scope as the new scope and resource ID for Fabric doesn’t seem to be preauthorized in Azure yet and you will encounter error
AADSTS65002.
If you are creating an access token using a Service principle, the specific scopes of the Fabric REST API can be used. These are comprised of the base URL https://api.fabric.microsoft.com/ followed by the item type and permission i.e. Workspace.ReadWrite.All. The acceptable access values are
- Read
- ReadWrite
- Execute
- Reshare
Useful Resources#
Creating an Access Token With PowerShell and Service Principle#
The following snippet shows how to create an Access Token with PowerShell, the key things to note is that this uses a Service Principle with Client ID and Client secret, and authentication is to the PowerBI scope.
## Replace these values with your own
$tenantId = "TenantID"
$appId = "AppID"
$appSecret = "ClientSecret"

## Authenticate with Azure AD using the App Registration
$authUrl = "https://login.microsoftonline.com/${tenantId}/oauth2/v2.0/token"
$body = @{
    grant_type = "client_credentials"
    client_id = $appId
    client_secret = $appSecret
    scope = "https://analysis.windows.net/powerbi/api/.default"
}
$authResult = Invoke-WebRequest -Uri $authUrl -Method POST -Body $body
$accessToken = ($authResult.Content | ConvertFrom-Json).access_token
Setting the service principle with the application permissions Tenant.Read.All and Tenant.ReadWrite.All will allow you to use the REST API to create Lakehouses with Service Principle Ownership, avoiding issues from Joiners/Movers/Leavers process.

MSAL Libary in .NET#
The quickstart guide shares a .NET snippet and walks through a set up of an app registration that the .Net MSAL library will use to get a token and make REST calls.
In the guide they use the redirect URI of http://localhost, however in my experience using the SPA set up will cause it to throw a CORS error as the origin header is not sent in the request, see this github issue for more details.
A working set up of the App Registration would be to create a Desktop/Mobile application instead.